Friday, October 9, 2015

Nintex Workflow Office 365 Setting Task Permission

As you all know the Built in permission for workflow task has been remove for SharePoint 2013 with this change Nintex Workflow is also affect in which can cause security issue to the application you are working. Here is a short workaround how you could setup the permission in a task to only allow authorized user to approve or reject a task.

Note: This is just a workaround until Nintex have created a way to add this to their product.

First we need to add an extra action to our Approval actions which involves adding a "Parallel Block" Action along with your approval Action.

On the Left side of the Parallel Block you will add your usual existing "Assign a task". While on the right part of the action we need to add "Loop with Condition" action


Inside the Loop with Condition we need to add a "Query List" action and Query to the "Workflow Task" lists(Where the workflow tasks are stored). While in the Filter Section we need to set the following conditions:


and also we need to set the Maximum number of rows to 1 then output type should be set to "Seperate out per column". I know what running in your mind why do we filter the data we are getting using the Task Name. I will explain later Trust me. Now for the Column to Select choose the Column "ID" and store it in a text variable. We will call this "VariableTaskID".

Now going back to the condition in the Loop with Condition we need to set that the loop will never end until "VariableTaskID" is empty. 


Now as promised we need to go back to our question in regard why we need to filter out the taskname. Now I hope you get your answer by doing the following. Go inside your approval task now in the Task Type Add the "Current Item:ID", this will serve as an indicator to our workflow on what the correct Task should we getting.

Hit Save
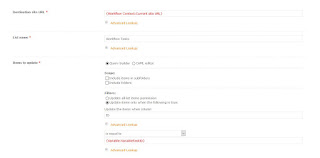
Now once the Loop with Condition has been satisfied(Meaning the VariableTaskID already has a value). We can now set the permission of task using "Office 365 update item permissions" action. Add Office 365 update item permissions after the loop condition. Fill in the cocorrect Destination site URL( I suggest using the "Workflow Context > Current site URL" variable so you it will be dynamic). For the List name set the list name of your Workflow Task, in my sample I add "Workflow Task" as my List Name. 


Now for the Filter we need to set the filter to use "Update items only when the following is true" then "ID" as the Condition is equal to our earlier variable (VariableTaskID )


Now for the User set the name of the user which you want to authorized to approve the task. The screenshot will help you how to setup the rest of the the text. 


With the following feature this will limit only the approver can view and edit his task. The other user will receive an access denied page when attempting to open the task item. You may return the security of by adding a "Office 365 Update item permissions" in the Approve/Reject outcome.

Please let me know if there is any topic you want to discuss for SharePoint.


Add Refiners for your Site Collection(Part 1)


Here are some OOB neat Feature you could use to make your SharePoint Sites more searchable for our user.

First we need create a Content type which we could add to our Site.


For this sample I am going to put a country property in my Site Collections. In our Content Type Hub Site go to our Site Settings


Once you're in the Site Settings Page find and select the "Site content types" under the "


This will redirect to the page where all content type is created. Click on the Create to Start Creating our Content type.

Kindly put in the Name of the content type we wanted. For the "Select parent content type from" select "Document Content Type" and for the "Parent Content type" kindly select the "Basic Page".


Click OK to save your changes. Once our Content type is created we may now start adding the Site Columns we wanted. Click on the "Add from new site column" link to start adding Site Columns to our Content type.

We will be a Site Columns in our Content type.

  • Global Funding Source
This will be choice fields with the following choice

  • Funding Source1
  • Funding Source2


Click OK to save our Site Column. This will redirect you back to our newly created Content Type, for now we will save this content type to all our Site Collection. Click and select the "Manage publishing for this content type" link.

Once the page had loaded select the "Publish" and then hit save.


Wait for 10-30 minutes for the Content type to be cascaded to all our site collection(Defending of the number of Site Collection in our Farm).


Add Refiners for your Site Collection(Part 2)


Once we have verified that the Content Type we created from Part 1 is already reflecting to our Site Collection.

Go to Site Content then Search for the "Site Pages" or "Page" Library(Where your Default Page is stored).

In our Example my homepage is located in "SitePages" library


Once your in the Site Page Library, in the ribbon select on the Library > Library Settings

Under the Content type section select the "Add from existing site content types" link. This will give you all the available Content Type for our Library. Select the Content Type we have created earlier the "Global Seach Page Tag" Content type


Hit OK to completely add our Content type to our Library. Now go back to our Site Page Library. 

We now need add extra value for our Homepage(Home.aspx). We can do that showing in the default view the Site Columns we have added by going to the "Library> Modify View" in the Ribbon. Check or Enable the check box for our Column("Global Funding Source")


With this the Global Funding Source column should now be displaying our default view. Now we need to add value to it, on the ribbon select Library>Quick Edit. 

I have added the "Funding Source 1" value for the "Global Funding Source" column


Now we need to make sure the the Search will be able to pick up our updates. We can force it by going to the Library Settings then in the "Advanced settings". In the middle part of the page click on the "Reindex Document Library" then confirm


Again we need to wait for Search to pick up our settings. 

Add Refiners for your Site Collection(Part 3)

Now in our last part we will learn how to setup our search refiners and also limit our Search Result to only show Site Collection and Subsites.

Let Start :)


Now Lets go our Search center and add a new Search Page. I named the Page I created "Funding Source Page". Now in our new page click on the Edit Page


Now we will now modify our Search Result we can do that by editing the property of the "Search Results" Webpart. This will show the properties of the webpart. Click on the the "Change query" button.


Click on the "Switch to Advance Mode" so that we could specify our own query. In the Query textbox type in the following query "{searchboxquery} contentclass:STS_Web contentclass:STS_site" then hit OK to apply our changes. The following query will limit the results to show Site Collection and Subsite only.


Click on Apply to save our changes to the page. Now we will now add our new Refiner. In the Refinement Webpart click Edit Webpart. Click on the "Choose Refiners" button. I mapped the column that we created earlier("Global Funding Source") the a refinablestring. Click here to view how I mapped the property.


Now moving the RefinableString to the Selected refiner and giving it a DisplayName I was able to use it to refine the Site being shown in my Search Center. With this I can add property to my Site collection like Country or Department so that my User will have an easier experience in find a site collection they needed.(Dont forget to check in everything and publish)